Ever spent so much time configuring your Raspberry Pi, installing software, modifying configs, coding maybe a project, only for it to crash or the SD card suddenly to corrupt?
Yeah, that’s heartbreak for sure. And while some might rush to format SD card, that won’t bring your lost data back, only a proper backup will.
A person who loves Raspberry Pi shouldn’t go through that; that’s why backup Raspberry Pi SD card is no longer optional-it’s mandatory.
Whether your project involves home automation passed through servers, a project on DIY weather stations, or even leading inquisitive learners in a classroom setup, you would want to be certain about losing your work.
Backup Raspberry Pi SD card creates peace of mind and a swift recovery when things go south.
Let’s read through just how to backup Raspberry Pi SD cards without losing much of a byte entry-level, foolproof, and consuming no hours from your life.
What You Need to Backup Raspberry Pi SD Card?
Before diving in, make sure you have the basics covered:
- Enough space on your PC: You’ll be copying the entire SD card, so make sure your computer has at least as much free space as the size of your SD card. If your Pi uses a 32GB card, clear out at least that much on your hard drive.
- A working SD card reader: Most laptops have one built-in. If not, you can grab a USB SD card reader they’re cheap and reliable.
Understanding Backup Types
Now, you could just drag and drop the files from the SD card onto your desktop… but that won’t truly save your system. Why?
Because a Raspberry Pi doesn’t just run on visible files, it depends on hidden partitions, bootloaders, and system configurations. That’s where disk image backups come in.
- .IMG files: These are full disk images, think of it as a carbon copy of your entire SD card, not just the files you can see.
- Why it matters: If something breaks, you can flash this .IMG file to a new SD card and your Pi will be back exactly where it was. Like nothing ever happened.
How to Backup Raspberry Pi SD Card?
Method 1: Using Balena Etcher (Simple and Sleek)
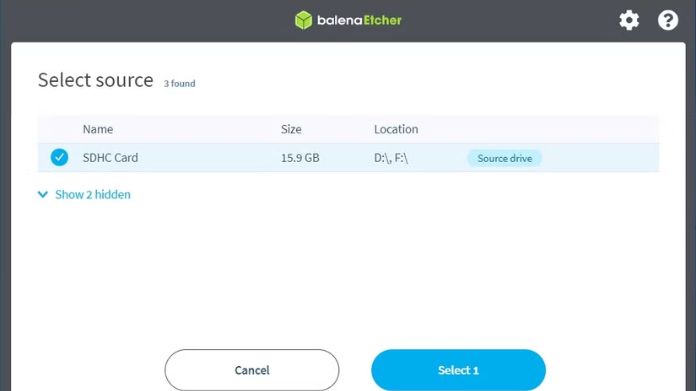 If you’re new to backups, Balena Etcher is your best friend. It’s modern, clean, and super easy to use.
- Download and install Balena Etcher from the official site.
- Insert your Raspberry Pi SD card into your computer.
- After that open Etcher and click on “Clone Drive” (in the newest versions).
- Choose your source drive (your Pi SD card) and target drive (where the backup image will be saved).
- Click “Clone” and let it do its thing.
- Once done, Etcher will verify the clone automatically to make sure nothing’s corrupted.
Restoring Your Backup
- Open Etcher, select your saved.IMG file, and write it to a new SD card.
- Pop it into your Pi and voilà! You’re back in action.
Method 2: Using Win32 Disk Imager
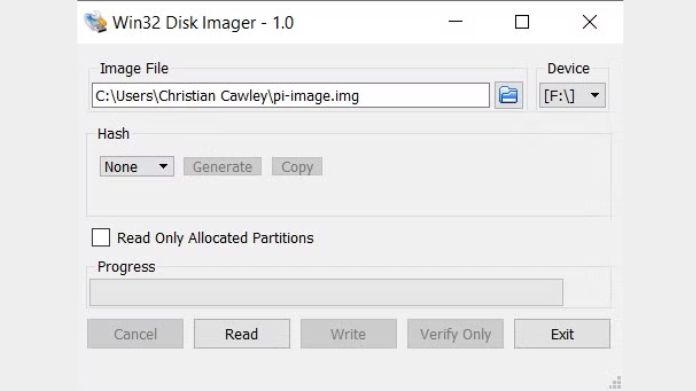 Most people would find Balena Etcher much easier to use, but Win32 Disk Imager gives the user more control, thus suitable for advanced users or those who prefer a no-frill interface.
- Install and launch Win32 Disk Imager.
- Insert your Pi SD card into the PC.
- Click the folder icon and define the output file path (e.g., RaspberryPiBackup.img).
- Select the correct device letter for your SD card.
- Hit “Read”, and this copies the entire SD card into that. IMG file.
To Restore:
- Simply use the “Write” function in the same app.
- Choose backup.IMG and a new SD card and tap on “Write.”
Best Practices and Limitations
Here’s how to make sure your backups are clean and effective:
- Shut down your Raspberry Pi properly before removing the SD card.
- Use high-quality SD cards from brands like SanDisk or Samsung; they last longer and are less prone to corruption.
- Invest in a decent SD card reader; cheap ones can give inaccurate or failed backups.
- Don’t wait for disaster. Set a backup schedule, maybe once a week or after every major project update.
- Keep multiple backups if possible (e.g., on a cloud drive, USB stick, or external HDD).
Wrapping It Up!
Backup Raspberry Pi SD card might feel like something unnecessary, but in the end, you will actually wonder why you hadn’t been doing it long ago.
It saves most hours put in doing rework, protects creative projects, and prepares your Pi for whatever lies ahead.


