Has your card ever been in your laptop, and you got the annoying “This disk is write protected” error? Yeah, everyone has faced it at one point or the other.
It’s really annoying because often times one needs to reuse it or to fix the corruption problem that was actually caused by it. In addition to that, you find the card blocked even to remove some simple space from it.
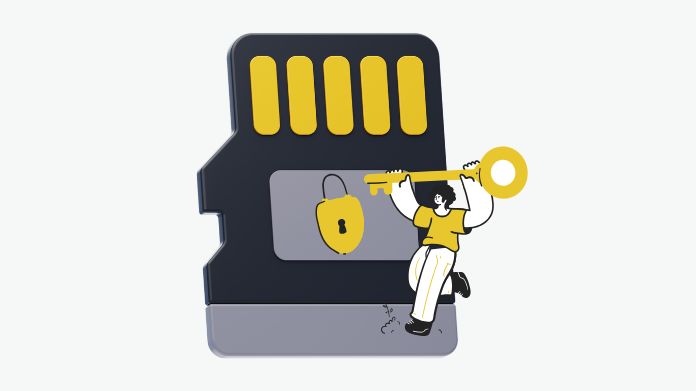
But here’s good news: format write protected SD card without losing your data is possible. It just takes the right steps (with maybe a bit of patience).
This is a complete guide for you to walk through from removing the write protection on the SD card to making it formatted like a pro.
What Does Write Protected Actually Mean?
When an SD card is write-protected, you cannot write any new files, add to them, overwrite them, or delete them. Let’s say it is in a “read-only mode.”
There are two main reasons this happens:
1. Hardware-Level Protection
Most of the time, there’s an inconspicuous switch on the side of your SD card. Slide it to “lock,” and boom, you can’t write to it anymore. It’s like flipping a privacy switch.
2. Software-Level Protection
Sometimes, your computer or a virus sets the card to read-only using hidden system settings, registry tweaks, or permissions. This can happen after a crash, improper ejection, or malware attack.
Common Causes:
- Accidental toggle of the SD card’s lock switch
- File system corruption or bad sectors
- Virus/malware infections
- OS or registry restrictions
Why Would You Want to Format Write Protected SD Card?
Great question. Here’s why to format write protected SD card might be your best option:
- To restore full functionality, especially after file system errors
- To clean the slate before reusing or giving the card away
- To fix corruption or glitches preventing proper use
But hold up, before we do anything risky, let’s save your data first.
How to Format Write Protected SD Card?
We can not directly format write protected SD card; it includes two sections first, we have to remove write protection, and then format SD card.
Section I: Remove Write Protection Before Formatting
Here’s the heart of the process, lifting that pesky write protection. Try these methods one by one:
1. Check the Physical Lock Switch
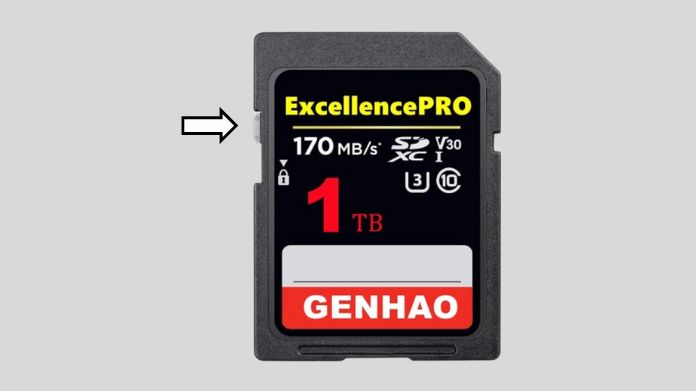 Take out the card and check for a tiny switch on the side. If it’s in the “Lock” position, slide it up (towards the connectors). Pop it back in and test again.
2. Scan for Viruses or Malware
 Sometimes, the SD card gets write protected because of concealed viruses or malware. These intrusions may adjust the settings of your card, preventing you from editing or deleting files there.
To fix this, plug in your SD card to the computer, scan it fully with the antivirus, remove any threats, restart the device, and then reinstate the card. Above all, check whether the write protection has been lifted.
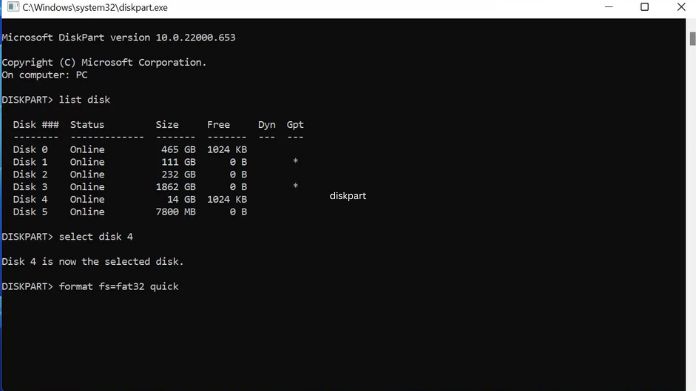
3. Use CMD to Clear Read-Only Attributes (Windows Only)
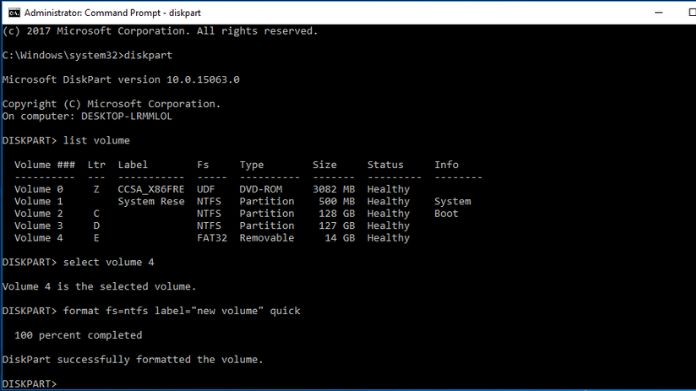
If you’re comfortable with command-line tools, this works wonders:
diskpart
list disk
select disk # (replace # with your SD card number)
attributes disk clear readonly
exit
4. Tweak the Windows Registry
- Press Win + R, type regedit, and hit Enter
- Navigate to:
HKEY_LOCAL_MACHINE\SYSTEM\CurrentControlSet\Control\StorageDevicePolicies
- Double-click WriteProtect and set the value to 0
- Restart your PC
5. Use Third-Party Tools
 If none of the mentioned actions work, you can try one of the special tools that fix SD card malfunctions. Such applications can remove write protection, repair damaged files, and use the card again.
Most of these applications are very user-friendly, meaning you just select the SD card and follow the on-screen steps. Always back up your data first, just in case something goes wrong during the process.
Section II: Format the SD Card
Once the write protection is gone, you’re free to format the SD card just like any regular drive.
Method A: Format via File Explorer or Disk Management

- Right-click your SD card in This PC
- Select Format
- Choose FAT32 (for <32GB), exFAT, or NTFS depending on use
- Click Start
Method B: Format with Command Prompt
 If you prefer commands:
diskpart
list disk
select disk #
clean
create partition primary
select partition 1
format fs=exfat quick
exit
This method is especially helpful if Windows Explorer won’t let you format.
Method C: Format via SD Card Formatter
 If you’re looking for a safe, reliable, and SD card-friendly way to format, this is your best. SD Card Formatter is a free tool developed by the SD Association (yep, the folks who actually define SD card standards).
Unlike Windows’ built-in formatting tool or third-party apps, it’s designed specifically for SD cards, and that’s a big deal.
How to Use SD Card Formatter:
- Download and install SD Card Formatter from the official website.
- Launch the tool and select your SD card from the list
- Choose either Quick Format or Overwrite Format (for deeper clean)
Click Format and you’re done!
How to Avoid Write Protection in the Future
Let’s make sure you don’t have to go through this again:
- Keep your SD card clean and away from dust and moisture
- Don’t remove it while files are transferring
- Use safe eject every time
- Scan regularly for malware
- Back up your important files often
Final Thoughts
They can be such a pain sometimes, these SDs are write-protected but not locked, especially when you are in a hurry.
However, all you need is the right steps, tools, and patience. You’ll do just what you need, in removing write protection and backing up data before going ahead with safely formatting that card.
Just remember: always start with backup; take it step-by-step, and don’t force anything that feels risky.
Have a stuck SD card story of your own? Share it in the comments or let us know what worked for you!


